Backrest 加密文件备份到云盘
备份思路:
利用rclone挂载网盘为文件系统,再利用Backrest加密备份到该挂载点。
由于使用的是百度云盘,百度云盘没有原生支持的webdav,所以部署openlist挂载百度云盘获取webdav。
参考文档:
1、部署openlist(可选)
这里不做过多介绍,利用docker部署,很容易就拉起一个openlist服务
mkdir -p /opt/openlist
cd /opt/openlist
vim docker-compose.yml
# docker-compose.yml
services:
  openlist:
    image: 'openlistteam/openlist:latest'
    container_name: openlist
    user: '0:0' # Please replace `0:0` with the actual user ID and group ID you want to use to run OpenList.
    volumes:
      - './data:/opt/openlist/data'
    ports:
      - '5244:5244'
    environment:
      - UMASK=022
    restart: unless-stopped
# 在同级目录运行
docker compose up -d
如需要nginx反代,提供下nginx配置文件
upstream openlist {
  server 127.0.0.1:5244;
}


server {
        listen       443 ssl;
        server_name  ol.crazy.com;

	    access_log  /var/log/nginx/ol-access.log  main;
        error_log  /var/log/nginx/ol-error.log;

        ssl_certificate "/etc/nginx/cert/crazy/fullchain.pem";
        ssl_certificate_key "/etc/nginx/cert/crazy/privkey.pem";

        ssl_session_cache shared:MozSSL:10m;
        ssl_session_timeout  10m;
        ssl_protocols TLSv1.1 TLSv1.2 TLSv1.3;
        ssl_ciphers ECDHE-RSA-AES256-GCM-SHA384:ECDHE-RSA-AES128-GCM-SHA256:ECDHE-RSA-AES256-SHA384:ECDHE-RSA-AES128-SHA256:ECDHE-RSA-AES256-SHA:ECDHE-RSA-AES128-SHA:ECDHE-RSA-DES-CBC3-SHA:AES256-GCM-SHA384:AES128-GCM-SHA256:AES256-SHA256:AES128-SHA256:AES256-SHA:AES128-SHA:DES-CBC3-SHA:!aNULL:!eNULL:!EXPORT:!DES:!MD5:!PSK:!RC4;
        ssl_prefer_server_ciphers on;

        location / {
           proxy_set_header X-Forwarded-For $proxy_add_x_forwarded_for;
           proxy_set_header X-Forwarded-Proto $scheme;
           proxy_set_header Host $http_host;
           proxy_set_header X-Real-IP $remote_addr;
           proxy_set_header Range $http_range;
           proxy_set_header If-Range $http_if_range;
           proxy_redirect off;
           proxy_pass http://openlist;
           # the max size of file to upload
           client_max_body_size 20000m;
        }

}
2、openlist下添加百度云盘存储,并支持webdav
- 配置百度云盘存储
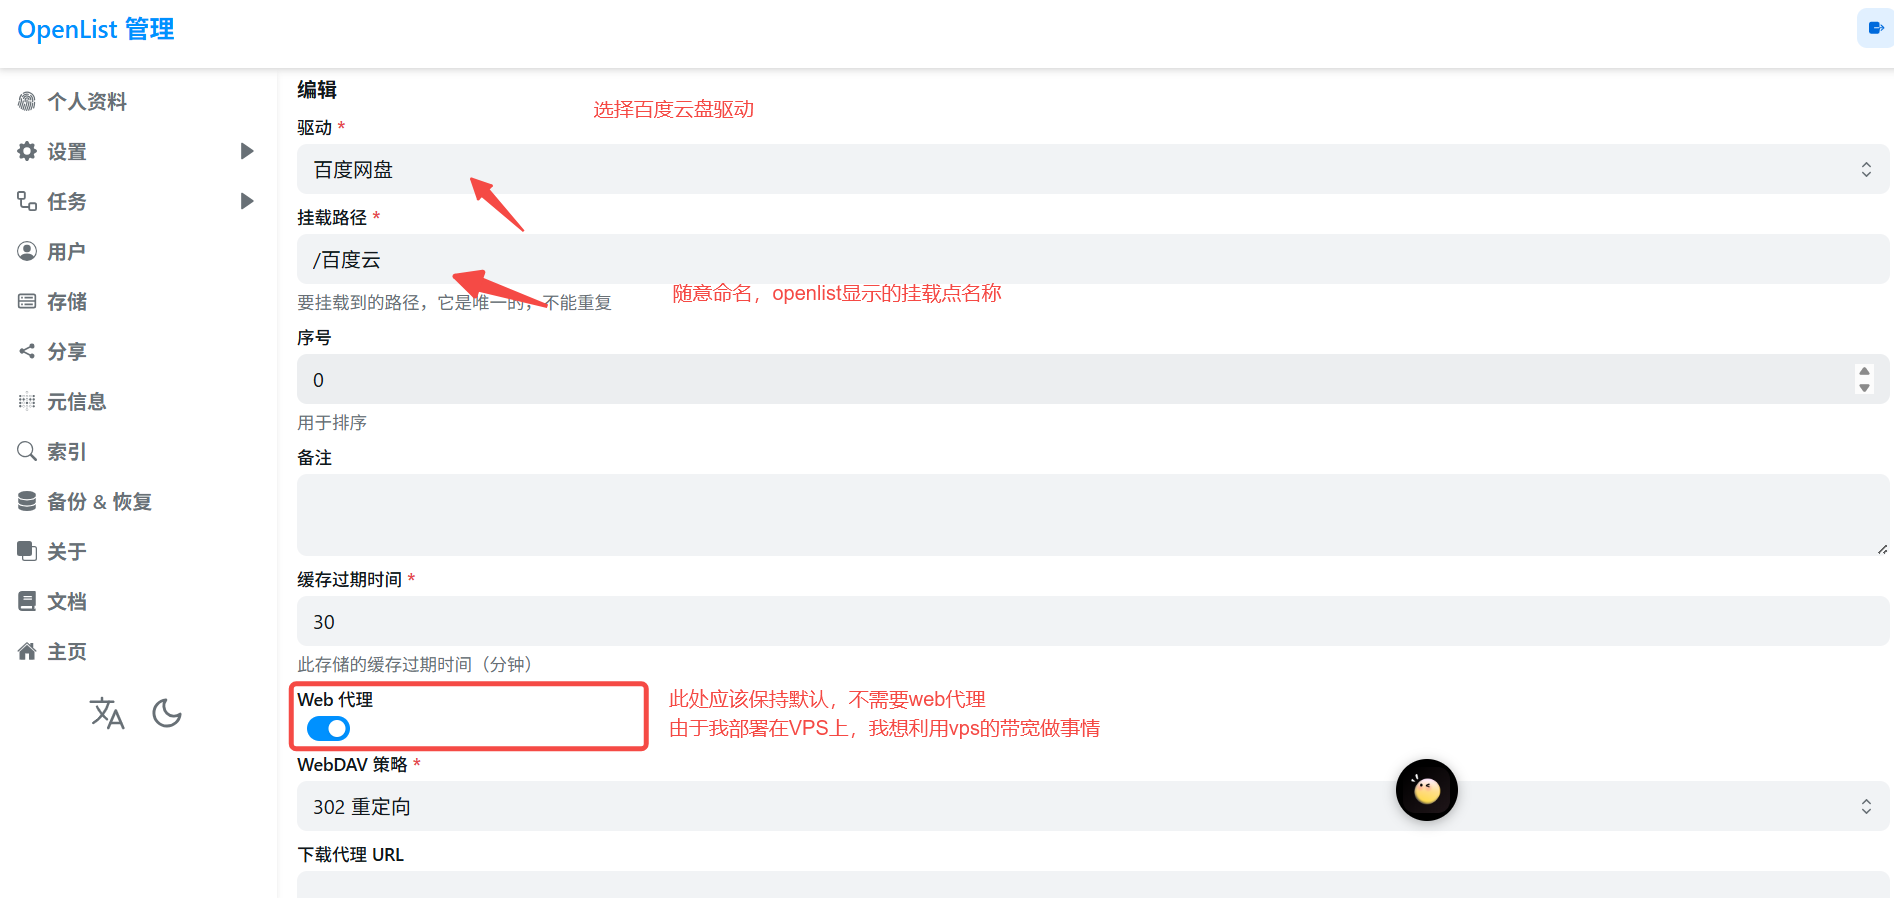
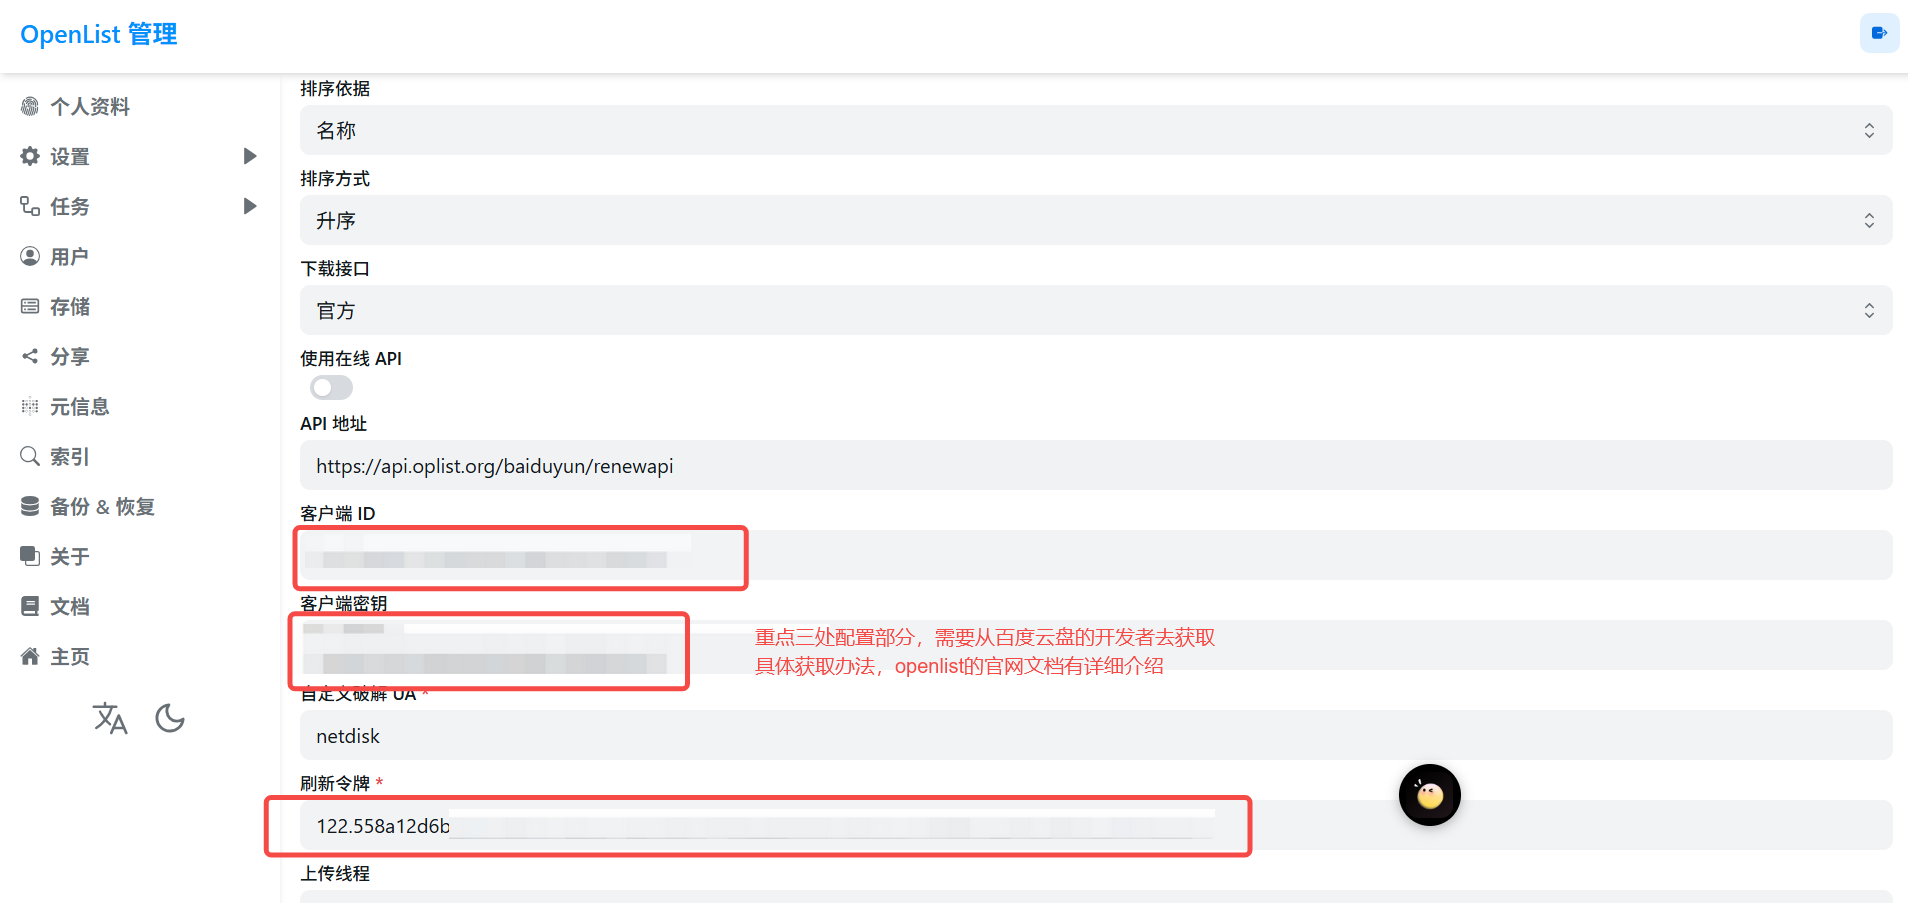
百度云盘的三个参数获取方式: openlist添加百度云盘存储
-
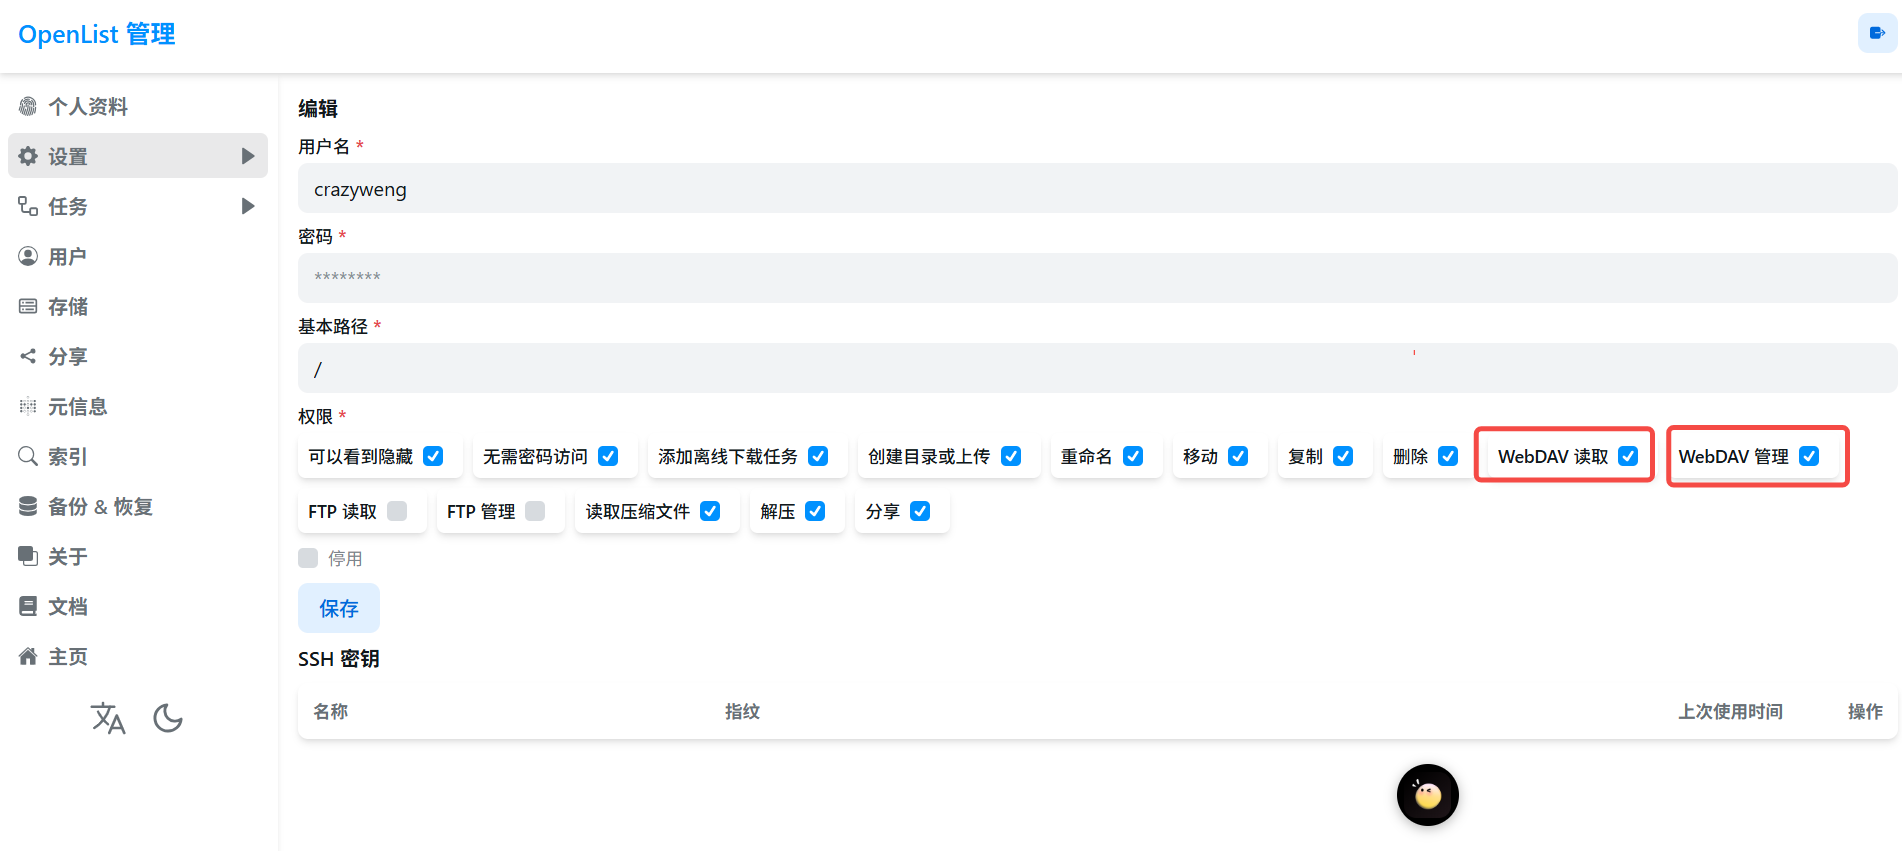
获取webdav的支持,主要在用户设置上
-
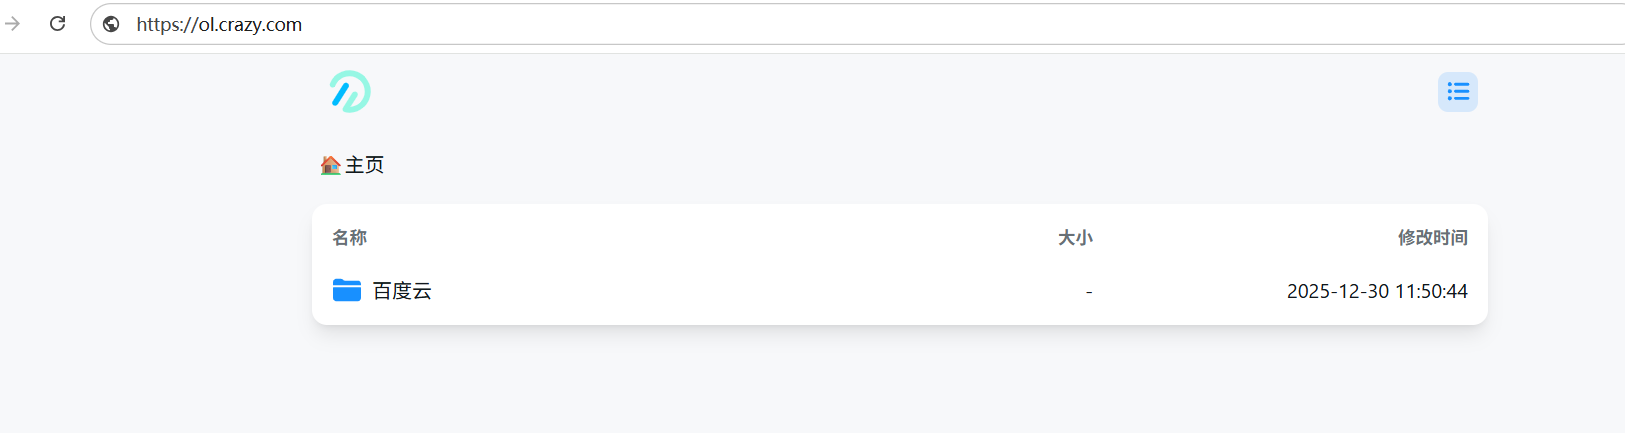
验证webdav
直接访问openlist的域名加/dav,需要验证用户名密码
https://ol.crazy.com/dav
3、利用rclone将webdav挂载为文件系统
-
安装rclone
curl -O https://downloads.rclone.org/rclone-current-linux-amd64.zip
unzip rclone-current-linux-amd64.zip
cd rclone-*-linux-amd64
ln -sf rclone /usr/local/bin/rclone
chown root:root /usr/local/bin/rclone
chmod 755 /usr/local/bin/rclone
验证rclone是否安装成功
rclone version
-
配置rclone.conf
# vim /root/.config/rclone/rclone.conf
[mybaiduyun]   # 自定义名称
type = webdav    # 远端类型
url = https://ol.crazy.com/dav # webdav地址
vendor = other
user = crazy # 用户名
pass = 3EG-1B2lFElLMgbqjdiNb2S8zuvbnqojD8I # 密码
-
验证是否成功
# rclone lsd 自定义名称:
rclone lsd mybaiduyun:
通过列出webdav目录,与openlist页面看到的是一致的即可。

-
挂载为文件系统 (需要fuse3文件系统的支持)
dnf install fuse3 -y # 安装fuse3文件系统的依赖
mkdir /baidyun
rclone mount mybaiduyun: /baiduyun --vfs-cache-mode full --daemon  # 此命令将webdav挂载到/baiduyun挂载点上
4、部署Backrest并进行备份数据到百度云盘
-
docker部署
mkdir /opt/backrest
cd /opt/backrest
vim docker-compose.yaml
# docker-compose.yaml version: "3.8" services: backrest: image: garethgeorge/backrest:latest container_name: backrest hostname: backrest volumes: - ./backrest/data:/data - ./backrest/config:/config - ./backrest/cache:/cache - ./backrest/tmp:/tmp # 前4个为backrest的一些数据库文件,配置文件,缓存文件,临时文件的挂载 # - ./backrest/rclone:/root/.config/rclone # Mount for rclone config (needed when using rclone remotes) - /baiduyun:/userdata # 此处我将/baiduyun挂载到容器内的/userdata - /mnt:/backupData # 将我本地的/mnt(我需要备份到云盘的数据目录)挂载到容器内的/backupData environment: - BACKREST_DATA=/data - BACKREST_CONFIG=/config/config.json - XDG_CACHE_HOME=/cache - TMPDIR=/tmp - TZ=Asia/Shanghai ports: - "9898:9898" restart: unless-stoppeddocker compose up -d -
k8s的deployment部署
# deployment.yaml
apiVersion: apps/v1
kind: Deployment
metadata:
  name: backrest
  labels:
    app: backrest
spec:
  replicas: 1
  selector:
    matchLabels:
      app: backrest
  template:
    metadata:
      labels:
        app: backrest
    spec:
      # 固定调度到 k3s-master,我的备份文件在k3s-master节点
      nodeSelector:
        kubernetes.io/hostname: k3s-master

      # 如果 master 有 NoSchedule 污点,这里兜底
      tolerations:
        - key: "node-role.kubernetes.io/control-plane"
          operator: "Exists"
          effect: "NoSchedule"
        - key: "node-role.kubernetes.io/master"
          operator: "Exists"
          effect: "NoSchedule"

      containers:
        - name: backrest
          image: garethgeorge/backrest:latest
          imagePullPolicy: IfNotPresent

          ports:
            - containerPort: 9898

          env:
            - name: BACKREST_DATA
              value: /data
            - name: BACKREST_CONFIG
              value: /config/config.json
            - name: XDG_CACHE_HOME
              value: /cache
            - name: TMPDIR
              value: /tmp
            - name: TZ
              value: Asia/Shanghai

          volumeMounts:
            - name: data
              mountPath: /data
            - name: config
              mountPath: /config
            - name: cache
              mountPath: /cache
            - name: tmp
              mountPath: /tmp
            - name: rclone
              mountPath: /root/.config/rclone
            - name: userdata
              mountPath: /userdata
            - name: backup-data
              mountPath: /backupData
              readOnly: true

      volumes:
        - name: data
          hostPath:
            path: /opt/backrest/data
            type: DirectoryOrCreate
        - name: config
          hostPath:
            path: /opt/backrest/config
            type: DirectoryOrCreate
        - name: cache
          hostPath:
            path: /opt/backrest/cache
            type: DirectoryOrCreate
        - name: tmp
          hostPath:
            path: /opt/backrest/tmp
            type: DirectoryOrCreate
        - name: rclone
          hostPath:
            path: /opt/backrest/rclone
            type: DirectoryOrCreate
        - name: userdata
          hostPath:
            path: /baiduyun
            type: Directory
        - name: backup-data
          hostPath:
            path: /mnt
            type: Directory
# backrest-svc.yaml apiVersion: v1 kind: Service metadata: name: backrest spec: type: NodePort selector: app: backrest ports: - name: http port: 9898 targetPort: 9898 nodePort: 30989 -
通过web访问backrest

-
创建一个Restic Repository
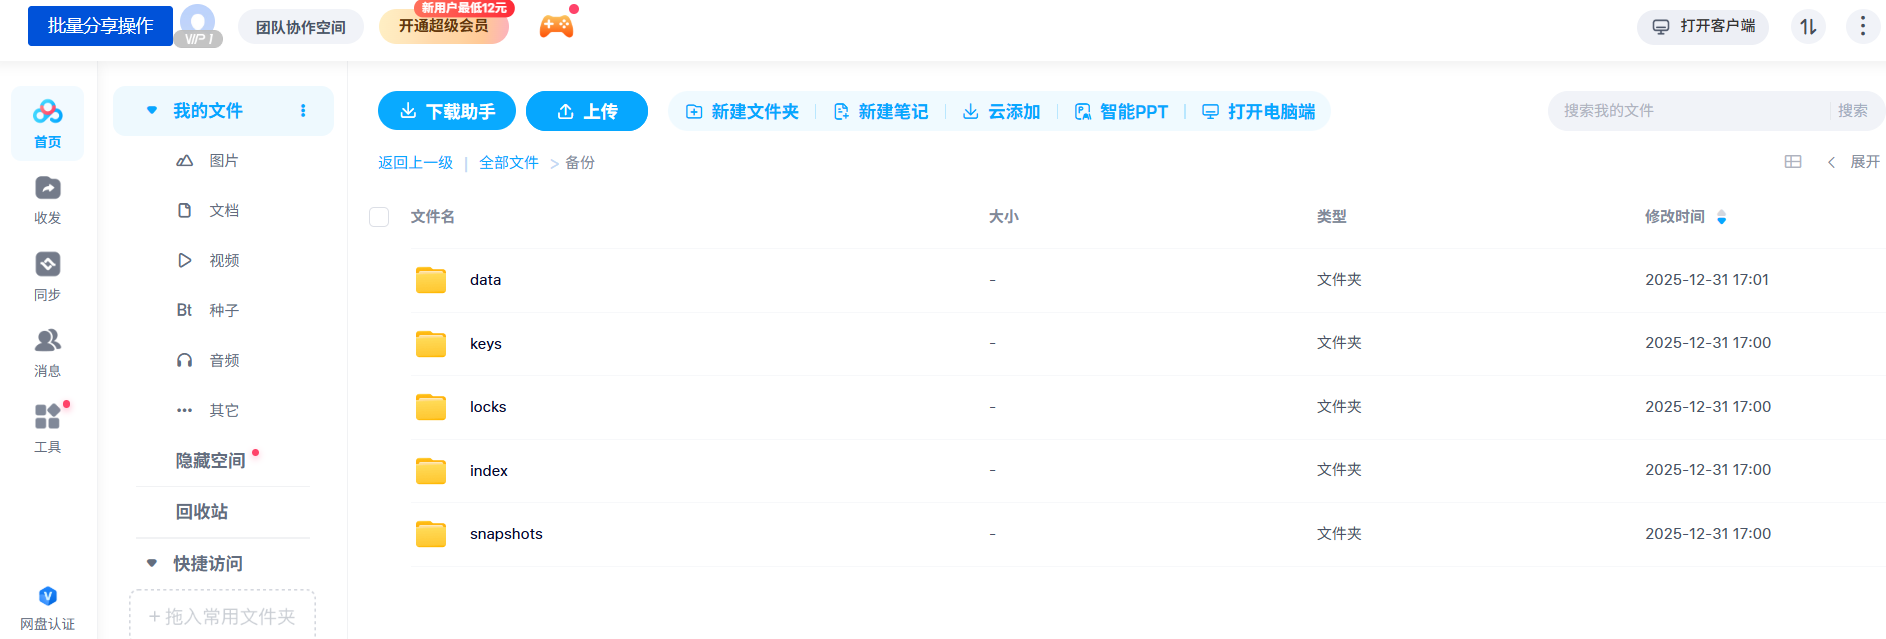
 这一步提交后会比较久,因为会在百度云盘下生成一些元数据文件,以下目录都是创建repo的时候生成的。
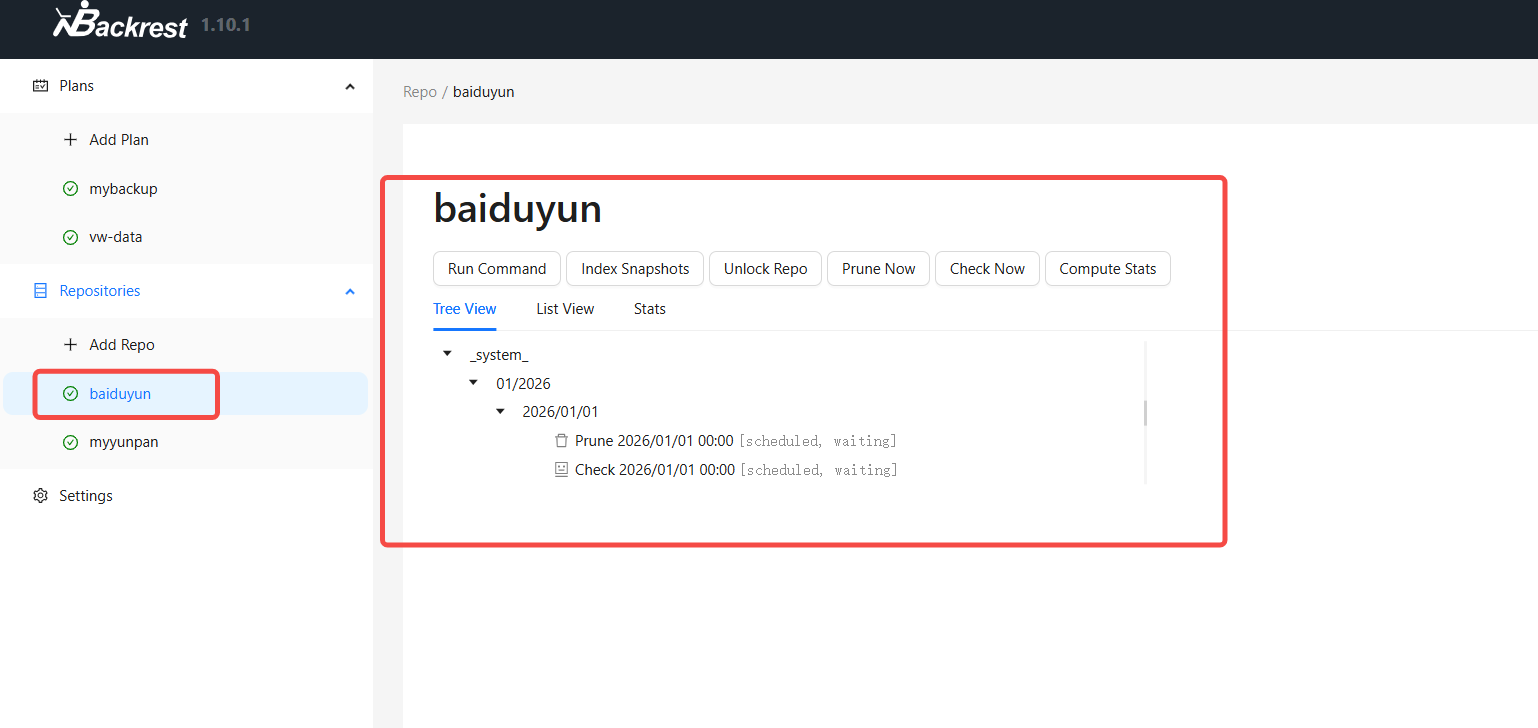
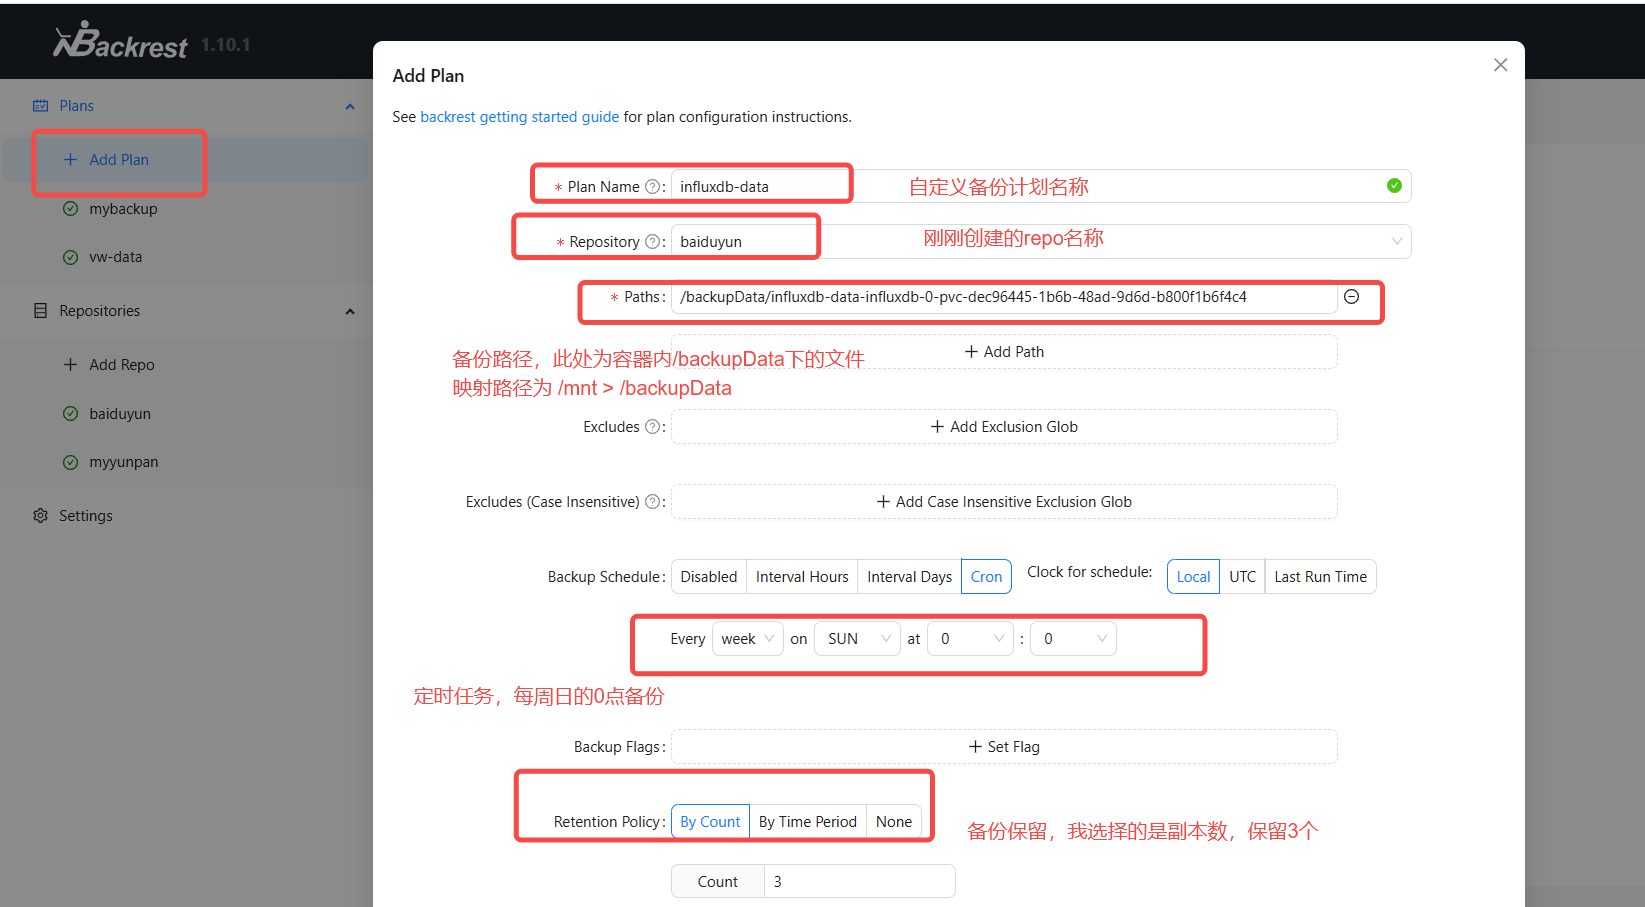
- 创建备份计划
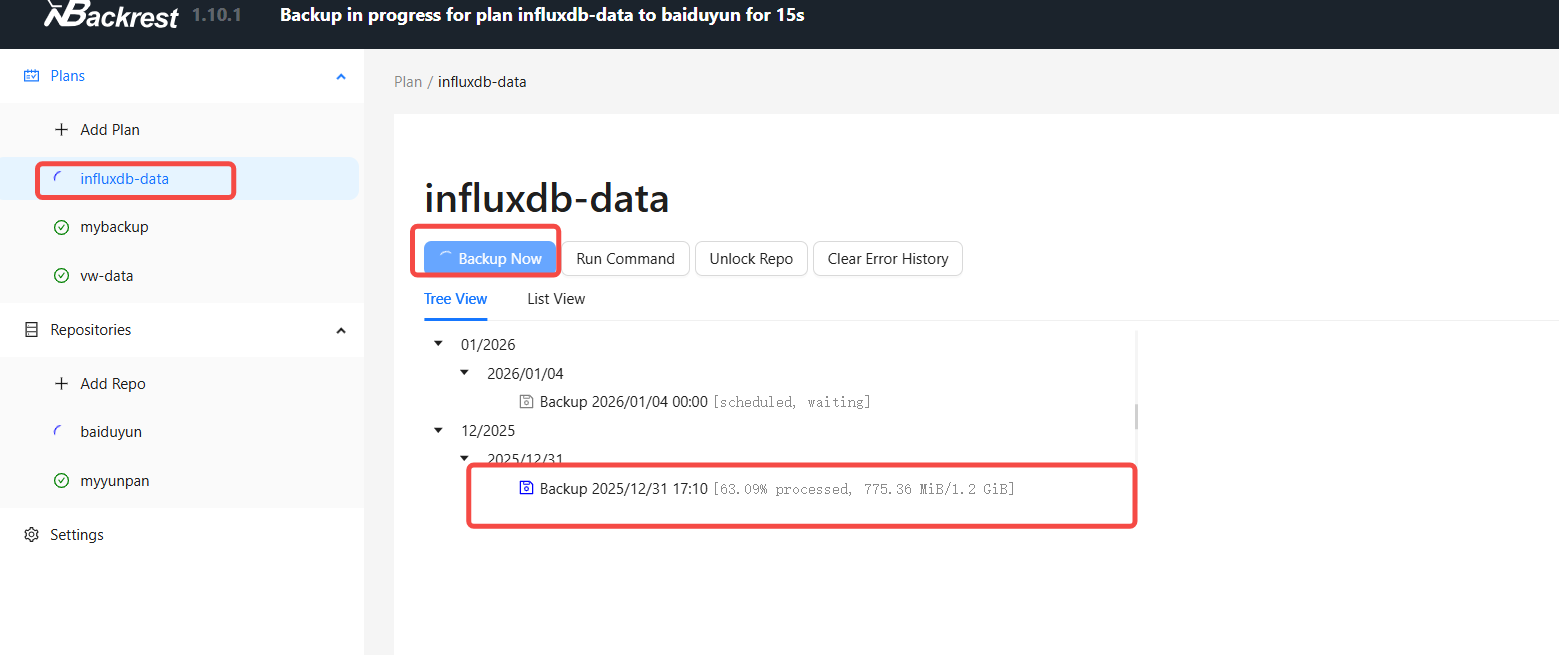
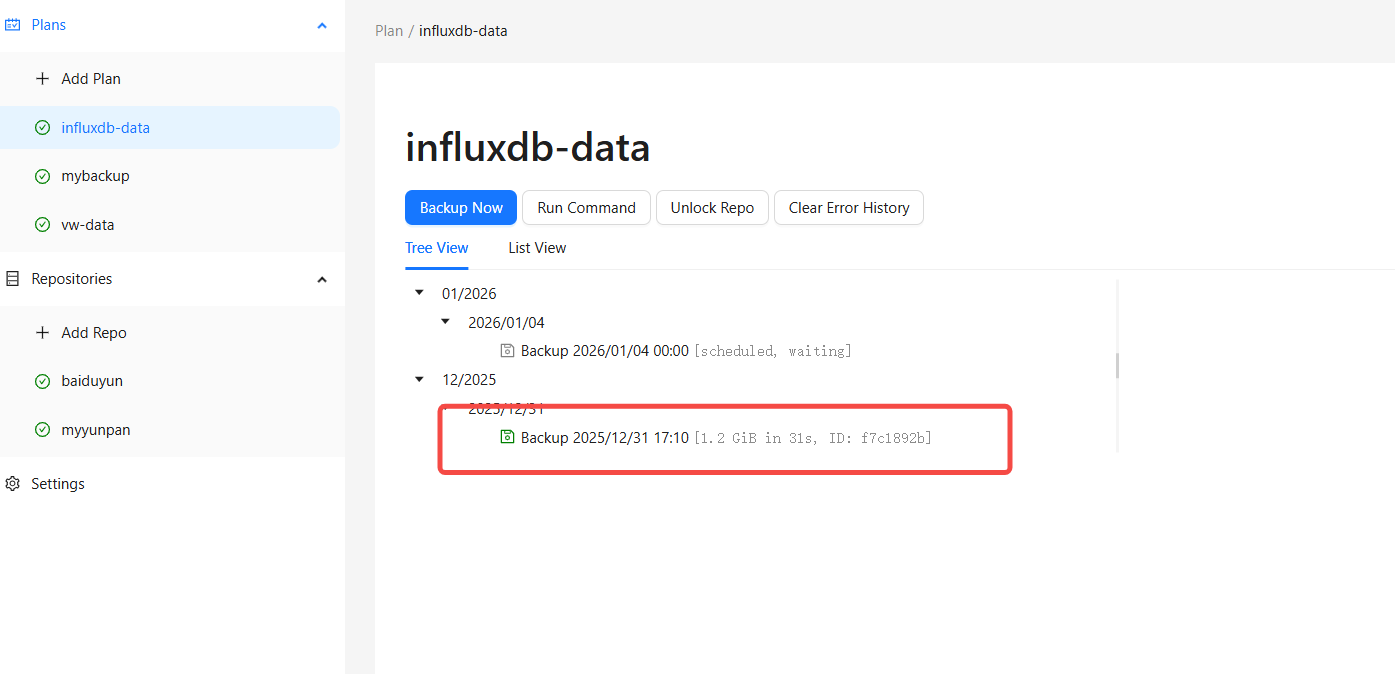
立马运行一下备份试试。
-
验证备份
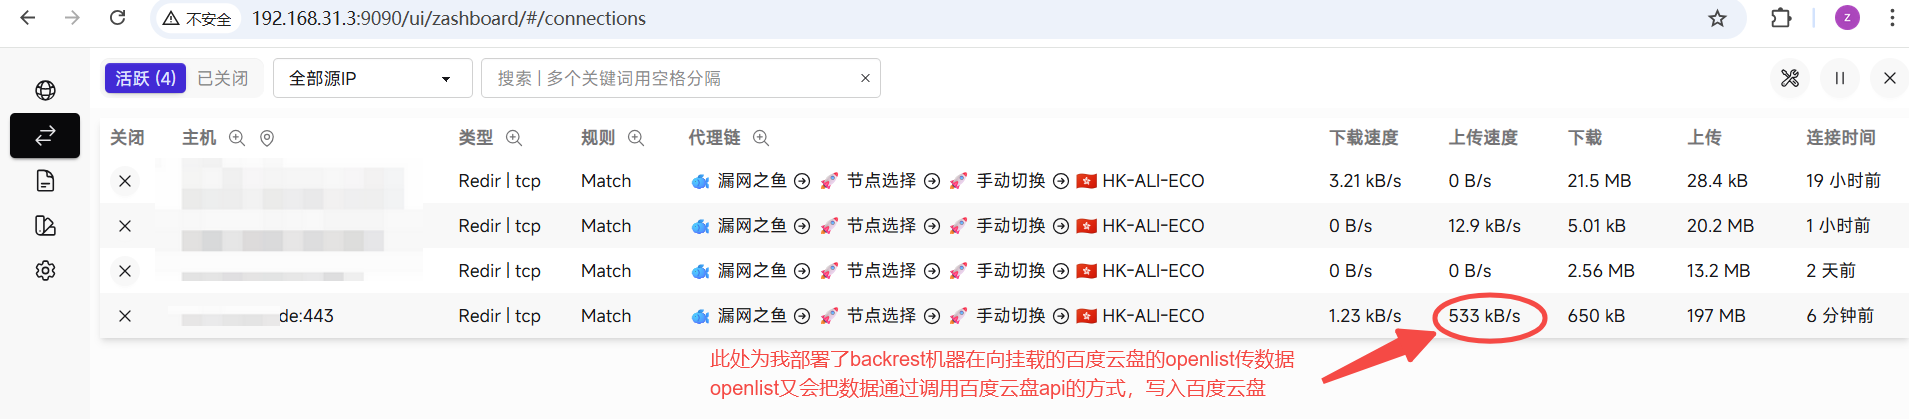
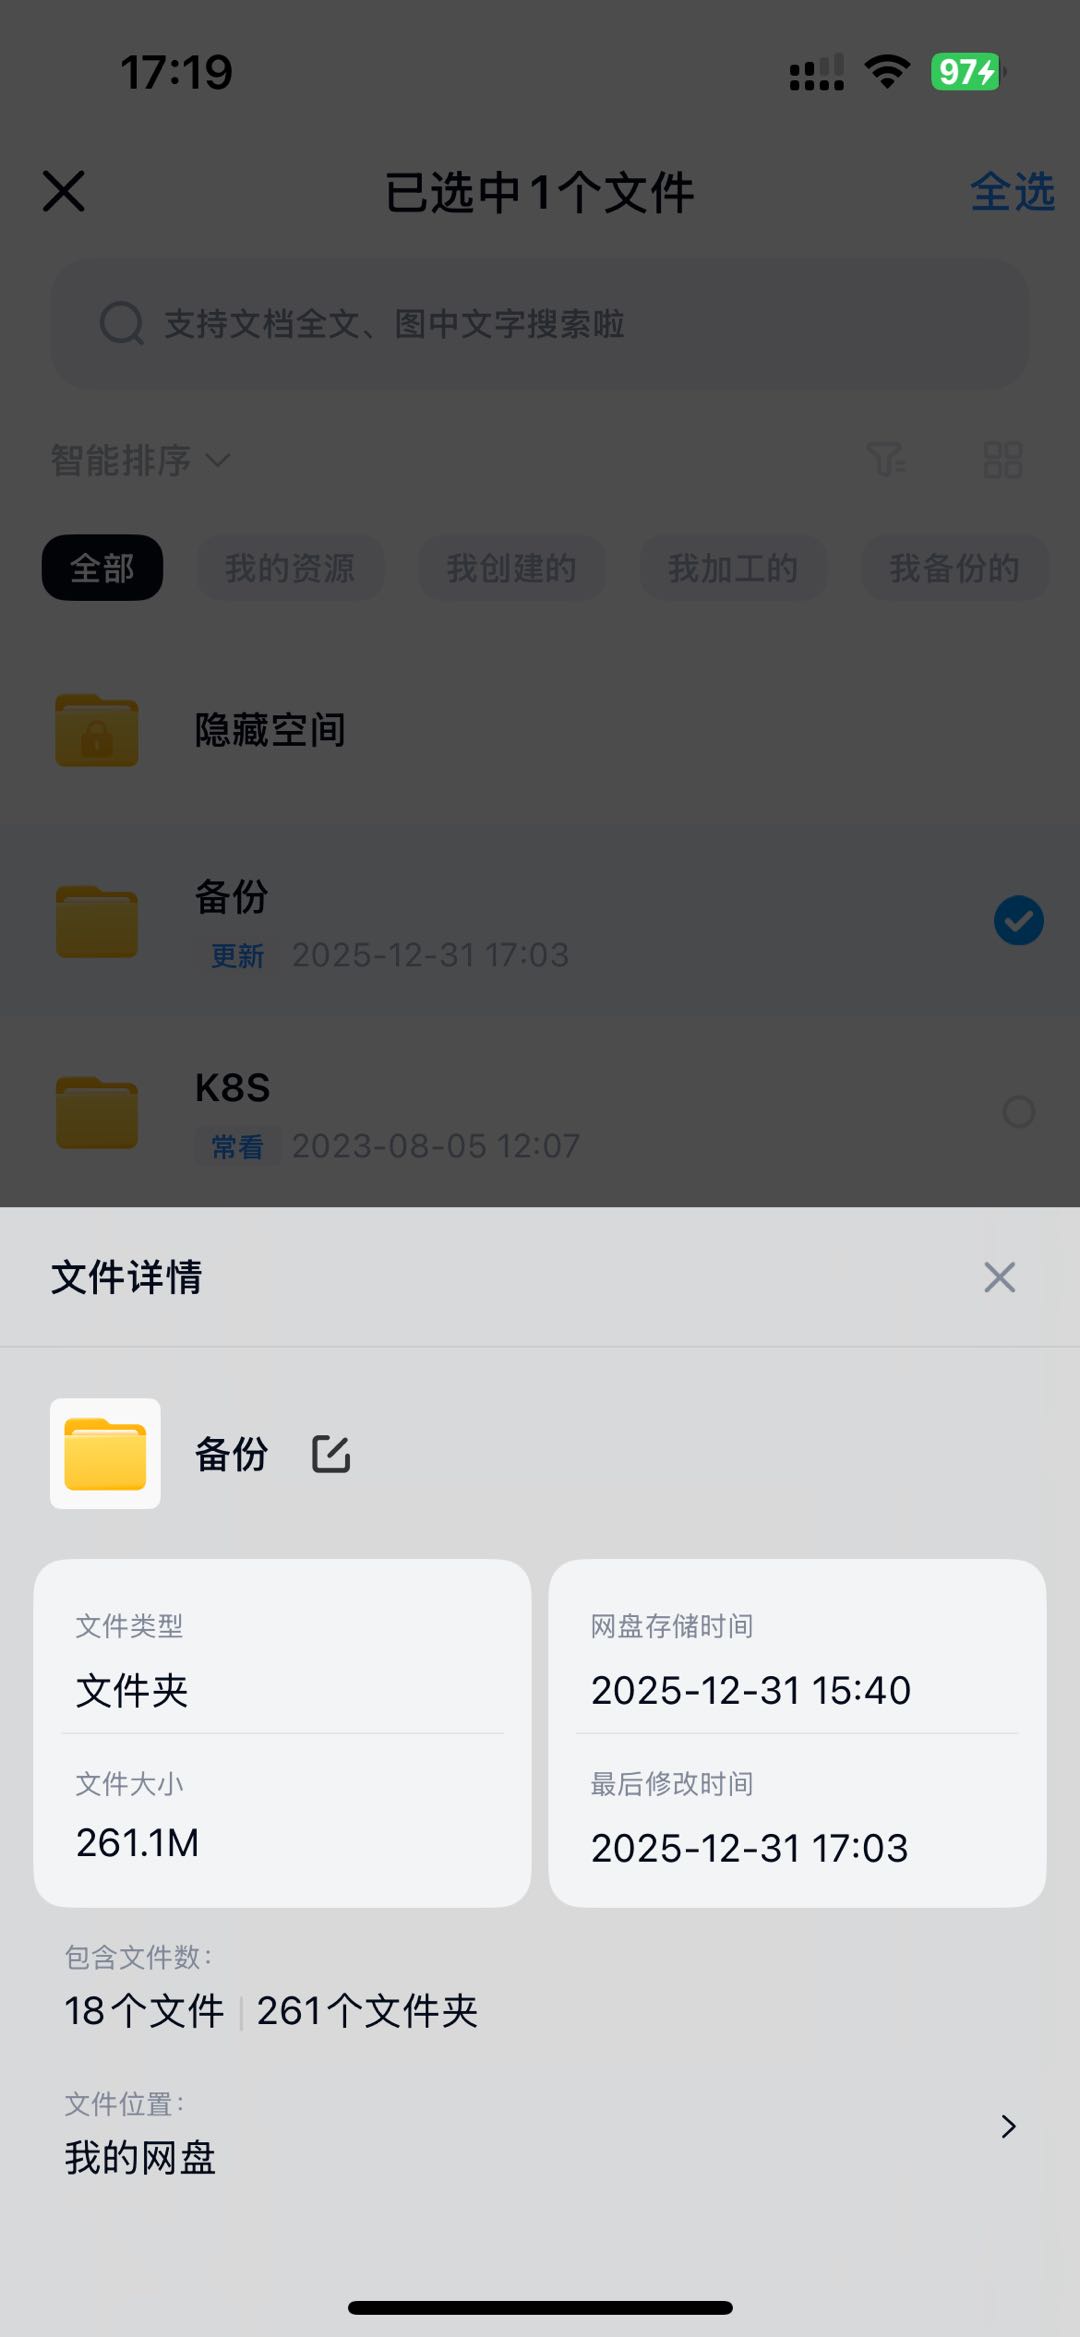
已经有数据在往云盘写入了。